Processing
Every specimen
can be processed, e.g. for preparation
or preservation. Processings can be applied
to a specimen or a part of a specimen.
In the hierarchy for the parts the
processings are indicated by the
 icon and a
blue text. If there are any
processings available, they will be indicated
by the icon in the tool bar. Please keep in
mind that the
availability of the
processings depend upon the
material category and the
current project as described below.
You can hide
icon and a
blue text. If there are any
processings available, they will be indicated
by the icon in the tool bar. Please keep in
mind that the
availability of the
processings depend upon the
material category and the
current project as described below.
You can hide
 or show
the processings
in the hierarchy
with a click on the icon in the very left bar (see below). The images below show a processing in
the collection
and the specimen tree for the parts respectively.
or show
the processings
in the hierarchy
with a click on the icon in the very left bar (see below). The images below show a processing in
the collection
and the specimen tree for the parts respectively.

You can enter a new processing for either the entire
specimen or a part of the specimen.
To do this select the specimen or part in the hierarchy
and choose a processing
from the list as shown below.
The duration of the processing is saved in
ISO
8601 format by default indicated by the
ISO icon with separate fields for
year to second (see below). To change to text format, click on the
ISO icon that will change to
ISO and the separate fields will be
replaced by a text box containing the value. If separate fields are
only available if the value is in ISO 8601 format. If the start date
for the processing is given the processing duration can be set via
the calender. In case of the ISO
format selected this will be translated into the corresponding
period. In case of the ISO format
deselected the date will be inserted. See a short introduction for
an overview:


To delete a processing select it and click on
the  button. To edit the data for a
processing select it in the
hierarchy. The window will
show you the fields related to the processing. You may add methods
for the processing as defined in section
Method.
button. To edit the data for a
processing select it in the
hierarchy. The window will
show you the fields related to the processing. You may add methods
for the processing as defined in section
Method.
(If
you previously used any
tools defined in the tool section, these
are deprecated and replaced by methods).
Administration
If you have
the required rights you may edit the
processing types in the menu entry
Administration - Processing...
In this window you can define the
processings used in
your collection.
To add a new processing click on the
 button,
to delete a processing select it and
click on the
button. The processings are related
to material categories within the database.
To add a new material category or projects, which
should be connected to the selected
processing, click on the
button in the panel right of the material categories or the
projects. A window will open where you need
to select the desired material category or project
respectively (see
below).
button,
to delete a processing select it and
click on the
button. The processings are related
to material categories within the database.
To add a new material category or projects, which
should be connected to the selected
processing, click on the
button in the panel right of the material categories or the
projects. A window will open where you need
to select the desired material category or project
respectively (see
below).
The processing types are
organized in a hierarchy.
Some of the entries may only serve for structuring as Maceration
in the example
below and should not be used to document the processing of
specimen parts. To ensure
this check the checkbox [Only hierarchy]. For
the import and export of data it is sometimes
necessary to know the ID's of the analysis types. To see the
ID's of the data sets click
on the ID button.
The ID's will then be displayed as in the image shown below.

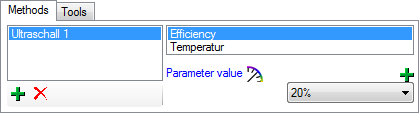
Besides of a plain text
description of the processing, you may insert methods as
defined in the
chapter Methods. Use the
 and
and
 buttons to add or remove methods
from the list
(see below). The added methods will be marked with
sequential number to allow several methods of the same type.
Every method may have several parameters
buttons to add or remove methods
from the list
(see below). The added methods will be marked with
sequential number to allow several methods of the same type.
Every method may have several parameters  that will automatically be available to take your values. If the definitions of
the parameters have been changed, you may add missing parameters with the
button. A window will open where you can select the missing
parameters you want to add.
that will automatically be available to take your values. If the definitions of
the parameters have been changed, you may add missing parameters with the
button. A window will open where you can select the missing
parameters you want to add.
To view the history of a data set, click on the
 button. A
window with the
history will open. For more details see the section History.
button. A
window with the
history will open. For more details see the section History.
The data of the processing is stored in the table
CollectionSpecimenProcessing.