Label
Select the printer
 in the header menu to switch to the printing mode. If your
specimen contains more than one part, choose the part of the
specimen for which the label should be generated. The sequence
is shown in the image below and in a short tutorial
in the header menu to switch to the printing mode. If your
specimen contains more than one part, choose the part of the
specimen for which the label should be generated. The sequence
is shown in the image below and in a short tutorial
 .
.
Additional information about a
label is entered
in the label section (see image below). The data are stored in
the table
CollectionSpecimen.
The organisms of a specimen are
printed on a label
according to the display order.
To print a label for a
specimen you have
to select a schema file. There
are default schema files available in the
folder LabelPrinting/Schemas
in your application directory (see below). This is the default place to store schema
files.
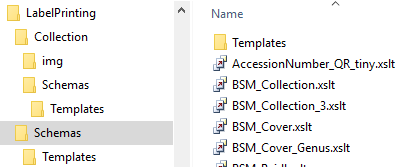
Click on the  button to open the directory. You
will find several prepared schema files among
which you can choose or change them to your own needs or
create new ones respectively. The
schema file /LabelPrinting/Schemas/Templates/LabelTemplates.xslt provides templates for
the other schema files. If this file is missing the generation of the label may fail and you will
get a warning. You may give a title for
the print in the field Title.
From the Collection and MaterialCategory
available for the selected
specimen choose one from the list
(Coll./Mat.).
To generate the label for the current specimen click on
the
button to open the directory. You
will find several prepared schema files among
which you can choose or change them to your own needs or
create new ones respectively. The
schema file /LabelPrinting/Schemas/Templates/LabelTemplates.xslt provides templates for
the other schema files. If this file is missing the generation of the label may fail and you will
get a warning. You may give a title for
the print in the field Title.
From the Collection and MaterialCategory
available for the selected
specimen choose one from the list
(Coll./Mat.).
To generate the label for the current specimen click on
the  button. To generate labels for
all specimens selected in your query click on
the
button. To generate labels for
all specimens selected in your query click on
the  button (you may use the
 button to select all specimens).
If you need duplicates of your
labels change the number in the duplicates
box
button to select all specimens).
If you need duplicates of your
labels change the number in the duplicates
box  to the desired value. You can
print 1 - 99 duplicates of one
label. If there are more than 20 specimens in
the list, you receive a warning
whether you really wish to create all these labels as
this could be somewhat time
consuming. The labels are generated as XML files
with XSLT-schema files, transformed
to HTML-files and depicted in a browser.
To print the label click on
the button.
to the desired value. You can
print 1 - 99 duplicates of one
label. If there are more than 20 specimens in
the list, you receive a warning
whether you really wish to create all these labels as
this could be somewhat time
consuming. The labels are generated as XML files
with XSLT-schema files, transformed
to HTML-files and depicted in a browser.
To print the label click on
the button.
If you wish to
print labels for duplicates which are
stored in a different collection, the duplicate should be a
child of the
original specimen as shown in the example below.


Depending on the schema you use, the
label will be
marked as duplicate and contain a reference to the original specimen
(see below).
If you wish to save the generated files
for later
printing, click on
the  button to
do so. Note that the program
will by default create a file Label.xml
and in case a schema file is specified a file
Label.htm in the
LabelPrinting
directory which will be overwritten every time you generate
a new label. Thus, you need
to save the file under a different name or in a different
directory to prevent the
program to erase this data.
button to
do so. Note that the program
will by default create a file Label.xml
and in case a schema file is specified a file
Label.htm in the
LabelPrinting
directory which will be overwritten every time you generate
a new label. Thus, you need
to save the file under a different name or in a different
directory to prevent the
program to erase this data.
If you
wish to print labels for all the specimens in the specimen list,
you can restrict these
to the collection and the material category of the current
specimen part (see
image above).
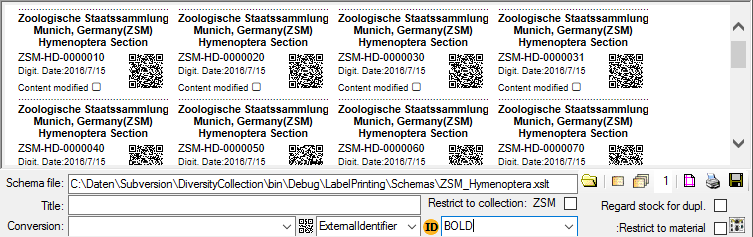
If you do not select a schema file, i.e. the
textbox Schema file: is empty,
you will see the generated
XML-file as shown in the image below. The
XML file is the base for
all label types you wish to generate.
To create your own labels simply
design your own XSLT-schema file
. See e.g.
http://www.w3.org/TR/xslt
for further information about schema
files.
If you wish to reformat the accession number, you may choose
among the options provided by the program,
e.g. conversion of arabic to roman numbers
(BSPG-1988-007-00001 -> BSPG-1988-VII-00001). Select the format from the
combobox [Conversion] shown above.
Codes
For a short tutorial about the inclusion of codes in the label see a short
tutorial
.
Code 39

If you use Code
39 for your labels and wish to print the
barcodes on the labels, you need the
font  ,
which is included in the DiversityCollection
package. Place this
font in the folder where your fonts are
stored (e.g.: C:\WINNT\Fonts). If
the font is not available, the barcode will
appear as the accession number
between two '*' signs. If this font does not do the job you may try other
fonts, e.g. code 39 from logitogo.
Download the font, copy it into your fonts directory and adapt the xslt file
according to the line below:
,
which is included in the DiversityCollection
package. Place this
font in the folder where your fonts are
stored (e.g.: C:\WINNT\Fonts). If
the font is not available, the barcode will
appear as the accession number
between two '*' signs. If this font does not do the job you may try other
fonts, e.g. code 39 from logitogo.
Download the font, copy it into your fonts directory and adapt the xslt file
according to the line below:
<xsl:variable name="FontBarcode"> font-size: 10pt; font-family: Code-39-Logitogo</xsl:variable>
QR-code

To include a QR-Code in the label, activate the QR-Code generator and select the source for the QR code (e.g.:
AccessionNumber, CollectorsEventNumber, DepositorsAccessionNumber,
ExternalIdentifier, PartAccessionNumber, StableIdentier or StorageLocation). For certain
sources you can specify the type of the source (see below). Depending on your
XSLT-schema the QR code will appear in your label (see below). The QR-Codes are
generated via a Google-Api, which is only available if you have access to the
Internet. The created QR-Code images will be stored in the folder
LabelPrint/img. This folder will be cleared for every printout. So if you want
to keep the label you need to copy the created file Lable.html together with the
folder img.