Import tab-separated
lists
Outdated
but kept for compatibility.
With this import routine
you can import data as tab-separated
lists (plain text files) into the database. Choose Data -> Import ->
Import list...
from the menu to open the window for import.
In the window click on the
 button to select the file with the data you wish to import.
Use the proper [encoding] to ensure
that all special characters will be transferred correctly. If
you change the encoding
after opening the file, click on the
 button to reload the file with the new encoding.
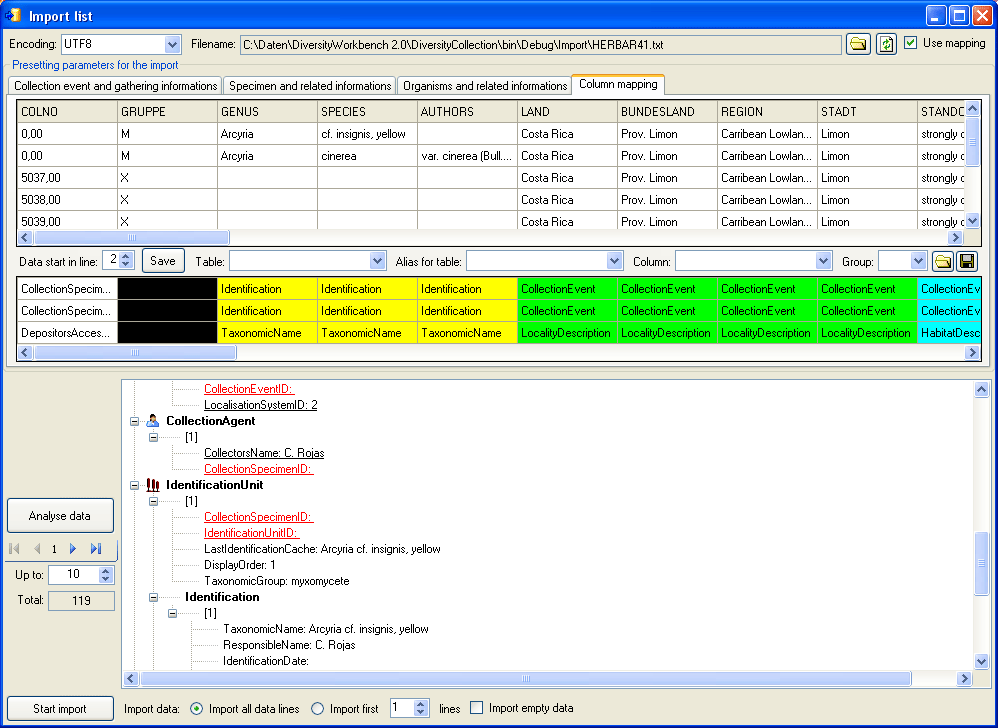
The content of the file will be
shown in the upper part
of the [Column mapping]
tab page. Use [Data start in line] to set the area for
the import. Proceeding lines will
be ignored and depicted with a gray background
as shown below. Every column in your file must be
either ignored or mapped to a column
in the database. The lower part of the mapping section shows
your mapping while the upper part
contains the first lines of your file. You can either use a
prepared
column mapping or create a new one. To import a previous
column mapping click on the
 button and choose
one of the XML-files.
Column
mapping
For a column which
should not be imported choose the
black color from the group as shown for the
second column in the image below. These columns
will be ignored for the analysis and the import. For all other
columns choose the
[Table] and the [Column] your data
corresponds to. If you wish to import two different
data sets in the same table, you need to change the
[Alias for table] to a unique
value for this data set.
If some columns should be transferred into
one field, you have to
choose a group for these columns as shown below for columns
3 to 5, 6 to 9, ... .
Simply choose a color from the group combobox other than
white or black to choose a group.
To save the current mapping click on the
 button.

To analyse the data in the file
click on the
[Analyse] button. During the analysis the program
may ask you to give additional
information like the taxonomic groups of the imported
organisms. In the upper part
of the window you may add information to be imported
together
with your data from the file. The available options depend
on the structure of your
data.
The image below shows the tab page
where you can define
the relations between two organisms. This might be necessary
if e.g. your data
contains information on parasites and
hosts. The data tables which are related to an
identification are listed with their
aliases in the lists for the identification tables. Use the
 and
and  buttons to move them between the lists. Use the
  buttons
to change the sequence within a list. With the [Host]
option
 you define the host and the [Main] option defines
which organism will be chosen
as the first to be printed e.g. on a label.

By default one CollectionEvent
will be created for
each data set.

If the events should be joined
following the entries in the file,
you can choose the second option as shown below. The import
will create a new event, if there were any changes made to
the data related to the CollectionEvent,
like the description of the locality, the altitude, the
coordinates etc.

If all the data sets belong to one
EventSeries e.g.
to one expedition, you can choose the option as shown below and
enter the code and description
of the EventSeries in the corresponding fields.

If you wish to use an existing
EventSeries, click on
the
 button and select a series from the form. The code and
description of the selected
series will be shown as in the image below.

After your data was successfully
analysed, the window will
show you the result as shown in
the image below. During the analysis the program will add
missing tables and columns
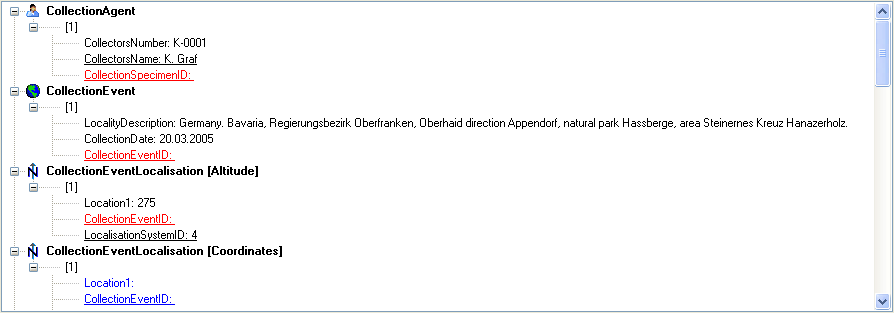
necessary for the import. The first data set will be shown
in the form. If you wish
to check more data sets, set the number of the last position
you wish to check and
click on the [Analyse] button. The data is arranged
according to the tables in
the database in which they will be imported. The underlined
fields belong to the primary
keys of the respective tables and are red,
if missing. These missing values will be generated during
the import. If a data set
contains no values and will therefore not be imported into
the database, the columns
will be shown in blue. To
import these entries
anyway choose the [import empty values] option. To
browse through the
data sets in the preview use the
 buttons.

To import the data click on the
[Start import]
button. If you wish to import only part of the data e.g. for
a test, choose the
[Import first ... lines] option.
 button to select the file with the data you wish to import.
Use the proper [encoding] to ensure
that all special characters will be transferred correctly. If
you change the encoding
after opening the file, click on the
 button to reload the file with the new encoding.
 button.
 and
and  buttons to move them between the lists. Use the
  buttons
to change the sequence within a list. With the [Host]
option
 you define the host and the [Main] option defines
which organism will be chosen
as the first to be printed e.g. on a label.


 button and select a series from the form. The code and
description of the selected
series will be shown as in the image below.
 buttons.
