

The data related to a project can be exported into
an archive. Choose Data -
Archive -
Create archive... from the menu. A window as shown below will open.
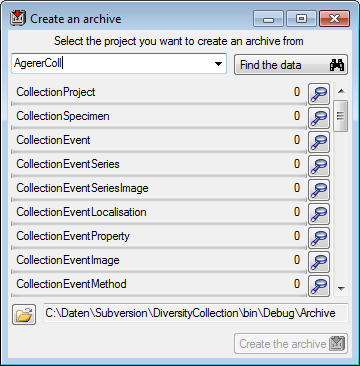
Select the project you want to create an archive of
and click on the Find the data  button. The data related with the project will be imported into temporary tables
to allow you to inspect them in advance of the creation of the archive (use the
button. The data related with the project will be imported into temporary tables
to allow you to inspect them in advance of the creation of the archive (use the
 buttons to see the data). To create the archive, click on the
Create the archive
button. A directory will be created containing a XML file for every table.
buttons to see the data). To create the archive, click on the
Create the archive
button. A directory will be created containing a XML file for every table.
Before you restore an archive, please make sure
that the data from the archive do not interfere with the data in the database.
In order to avoid problems you should clean the database from any user data. To
clear the database from any user data, choose Data -
Archive -
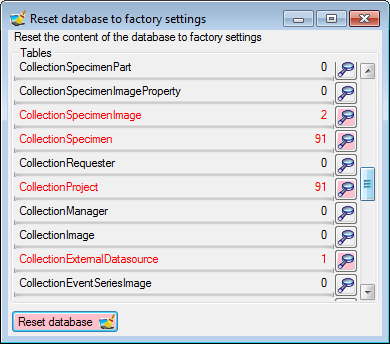
![]() Reset database... from the
menu. A window as shown below will open listing all tables and the number of
data within these tables. Click on the Reset database
Reset database... from the
menu. A window as shown below will open listing all tables and the number of
data within these tables. Click on the Reset database ![]() button to remove any of these data
including any data in the log tables.
button to remove any of these data
including any data in the log tables.

To restore an archive choose Data -
Archive -
Restore archive... from the menu. A window as shown below will open
listing the tables in the database. To restore an archive click on the Choose
archive directory
 button and select the directory containing the
archive files. Next click on the Read data
button and select the directory containing the
archive files. Next click on the Read data  button to import the data from the XML files into temporary tables.
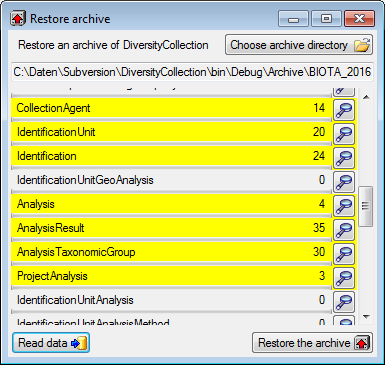
With a click on the
buttons you can inspect the content of the temporary tables. Finally click on
the Restore the archiv
button.
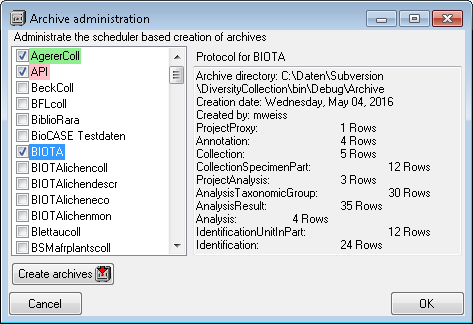
To administrate the schedule based creation of
archives choose Data -
Archive -
Administrate archives... from the menu. A window as shown below will open listing
the projects in the database. Select the project that should be included in the
schedule based creation of archives. To create an archive for all selected
projects, click on the Create archives
button. The protocol of a previous
archiving is shown as in the image below.
Successful runs are indicated with a
green color while failures have a red background (see below).

Next to the data, the archive files contain a xsd description of the tables. To create xsd schemata independent of the content, select Data - Archive - Create schema from the menu. A windows as shown below will open with the list of all tables where the main tables of the database are preselected.
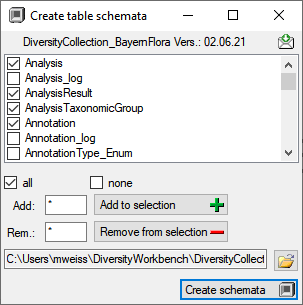
To change this selection you
may use the  all and
  none buttons resp. the Add
to selection
none buttons resp. the Add
to selection
 and Remove from
selection
and Remove from
selection  options using
* as a wildcard. Click on the Create schemata button to
create the schemata for the selected tables in the
predefined directory. The
options using
* as a wildcard. Click on the Create schemata button to
create the schemata for the selected tables in the
predefined directory. The  button will open this
directory containing the created files. The schemata contain
the name of the DiversityWorkbench module and its version,
the definition of the table, the primary key and the colums
together with their datatype and description (see the
example below).
button will open this
directory containing the created files. The schemata contain
the name of the DiversityWorkbench module and its version,
the definition of the table, the primary key and the colums
together with their datatype and description (see the
example below).
<DiversityCollection_02.06.21>
<xs:schema
id="DiversityCollection_02.06.21">
<xs:element
name="DiversityCollection_02.06.21" msdata:IsDataSet="true"
msdata:MainDataTable="Analysis"
msdata:UseCurrentLocale="true">
<xs:complexType>
<xs:choice minOccurs="0"
maxOccurs="unbounded">
<xs:element name="Analysis">
<xs:complexType>
<xs:sequence>
<xs:element name="AnalysisID"
msdata:Caption="ID of the analysis (primary key)"
type="xs:int"/>
<xs:element
name="AnalysisParentID" msdata:Caption="Analysis ID of the
parent analysis, if it belongs to a certain type documented
in this table" type="xs:int"/>
<xs:element name="DisplayText"
msdata:Caption="Name of the analysis as e.g. shown in user
interface" type="xs:string"/>
<xs:element name="Description"
msdata:Caption="Description of the analysis"
type="xs:string"/>
<xs:element name="MeasurementUnit"
msdata:Caption="The measurement unit used for the analysis,
e.g. mm, �mol, kg" type="xs:string"/>
<xs:element name="Notes"
msdata:Caption="Notes on this analysis" type="xs:string"/>
<xs:element name="AnalysisURI"
msdata:Caption="URI referring to an external documentation
of the analysis" type="xs:string"/>
<xs:element name="OnlyHierarchy"
msdata:Caption="If the entry is only used for the
hierarchical arrangement of the entries" type="xs:boolean"/>
<xs:element name="LogCreatedWhen"
msdata:Caption="Point in time when this data set was
created" type="xs:dateTime"/>
<xs:element name="LogCreatedBy"
msdata:Caption="Name of the creator of this data set"
type="xs:string"/>
<xs:element name="LogUpdatedWhen"
msdata:Caption="Point in time when this data set was updated
last" type="xs:dateTime"/>
<xs:element name="LogUpdatedBy"
msdata:Caption="Name of the person to update this data set
last" type="xs:string"/>
<xs:element name="RowGUID"
msdata:DataType="System.Guid, mscorlib, Version=4.0.0.0,
Culture=neutral, PublicKeyToken=b77a5c561934e089"
msdata:Caption="" type="xs:string"/>
</xs:sequence>
</xs:complexType>
</xs:element>
</xs:choice>
</xs:complexType>
<xs:unique name="Constraint1"
msdata:PrimaryKey="true">
<xs:selector xpath=".//Analysis"/>
<xs:field xpath="AnalysisID"/>
</xs:unique>
</xs:element>
</xs:schema>
</DiversityCollection_02.06.21>

To archive the data in a scheduler based background process, you
can start the application with the following arguments:
C:\DiversityWorkbench\DiversityCollection> DiversityCollection.exe Archive snsb.diversityworkbench.de 5432 DiversityCollection C:\DiversityWorkbench\DiversityCollection\Archive
The application will create the archives, generate the protocols as described above and quit automatically after the job is done. The user starting the process needs a Windows authentication with access to the SQL-Server database and proper rights to archive the data. If the last argument is not given the default directory [...\Application directory\Archive] will be used.